
A webpage redirect tells a web browser to go to a different webpage than the one that used to be there.
That’s it.
Nothing fancy – just simply saying the URL of the page has been updated.
If you wanted to pigeonhole a redirect, it would sit under the realm of Technical SEO.
In this article, we’ll chat about why you might want to use a redirect, the most common types of redirect and then we’ll show you examples of how to step up redirects in WordPress, Shopify and Squarespace.
If you’re just itching to get to the how part of the article, then go for it. This is what we’ll be covering…
- Why would you redirect a webpage to another webpage?
- What’s the difference between a 301 and 302 redirect?
- How to setup a 301 redirect in WordPress
- How to setup a 301 redirect in Shopify
- How to setup a 301 redirect in Squarespace
Why would you redirect a webpage to another webpage?
There are many reasons to redirect one page to another.
Let’s say you have a page on your site that had the URL of url.com/cats. Now let’s imagine you decide to update that URL to url.com/cats-and-kittens. Any traffic going to the old URL would get a 404 (page not found) error which isn’t that nice.
The user doesn’t know where to go next, and you’ve potentially lost a customer.
To combat that, we’d create a redirect so that traffic to the old URL would redirect to the new one.
Think of it like mail forwarding when you move house.
Sometimes redirects are used heavily when a business changes their name and main domain (eg: url.com/cats moves to newurl.com/cats and so do a million other pages).
Another useful way to use a webpage redirect is if you have a whole bunch of blog posts or pages that are talking about much the same thing. If you decide to amalgamate them all into one awesome article, you would create redirects from all the old articles to the one new one. That way, anyone who may find the URL of your old page will be redirected to the new one.
Sometimes a redirect is put in place because the publisher of the article just changed their mind and decided that a different URL structure was more appropriate.
So long as they’re done properly, redirects aren’t a huge issue in most cases, except for SEO. The main problem when it comes to SEO is that it might take Google and other search engines a while to work out that any SEO benefit your old page had should flow to the new one.
To try to avoid having to use redirects, decide on the URL structure of your website early and stick to it!
What are all the different ways to redirect a webpage?
There are multiple types of redirect that depend on your desired outcome. All of them do the same thing (redirect your webpage to a new webpage) with the difference between them being why the redirection is happening.
A 301 redirect is permanent
A 301 is the most common type of redirect. Setting this up means that the page that used to be here no longer exists and that anyone who wanted to find this particular page should be redirected to a different page.
This type of redirect also tells the search engines to stop indexing this page, and instead index the new one.
It also tells the search engines that any SEO value or equity of the old page should be passed to the new one.
So if you have a page that is ranking well on Google, and then you change its URL structure and implement a 301, then the new page should keep the same ranking.
Without a 301 in place, the old URL would become a 404 Page Not Found and all SEO value would be lost until the new page could hopefully gain it back over time.
301 redirects are also commonly used when a site upgrades from HTTP to HTTPS.
A 302 redirect is temporary
Specifying a 302 redirect tells search engines that the page doesn’t exist at the moment, but to keep checking, as the page will eventually be reinstated. Any SEO value attributed to the old page is kept, and the new page does not gain any of the old page’s equity.
In our experience, temporarily redirecting a page to another generally isn’t generally a good idea. We have worked with some businesses who activate a 302 when an item sells out, or if they hold seasonal stock.
The way this works is that a prospective customer clicks on a link to an item. If the item is out of stock, then the store redirects them to the general product pages of the site, in the hope the customer finds something else they’d like.
While this isn’t necessarily a bad idea all of the time (these things are never black and white), we’d argue that simply having an out of stock notice gives a far better user experience. With that notice could also be an email opt-in so the customer can be notified when you’ll have more stock in, as well as a link to your main product page.
A 303 redirect is for one-time only data
A 303 redirect is for pages that shouldn’t be bookmarked or refreshed as they’re holding temporary data. This is commonly for things like payment confirmation pages or upload progress pages.
The chances that you’d ever need to use one is slim as they’re generally handled by back-end developers or the web platform you’re using.
There are others, such as 300, 304, 305, 306, 307 and 308. If you want to get into them, go for it.
Most of what we’ll be looking at in the rest of the article are interchangeable between 301 or 302. Being that a 301 is the most common, that’s what we’ll be demonstrating.
How to create a 301 redirect in WordPress
![]()
As with many things in the WordPress ecosystem, you’ll need an external plugin to do a 301 redirect (or hand-code it yourself).
Editing .htaccess files on Apache servers isn’t our idea of fun, so we’re not going to go into that here.
Creating a 301 redirect in WordPress without a plugin
This kind of thing is reasonably straightforward, but if you aren’t comfortable with code, then skip this and take a look at one of the plugin options below.
At the top of your WordPress PHP template, type the following
Creating a 301 redirect with a free WordPress plugin
There are hundreds of plugins that will do redirects for you. The one we use is called Redirection and it is super simple to use.
We’ve used many free WordPress redirection plugins, and Redirection consistently fills every requirement we’ve ever needed.
It is also 100% free with no premium version. 100% awesome with zero price tag.
With Redirection, you can easily setup up redirections based on conditions, such as whether a user is logged in or not; whether they’re using a particular browser and much more.
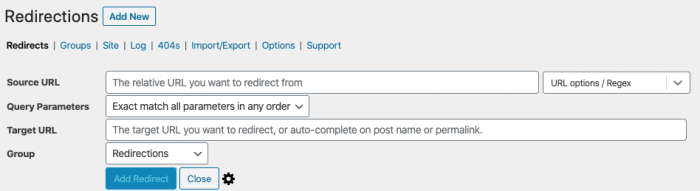
As with most of the techniques listed here, the process is fairly simple:
- Install and activate the Redirection plugin
- Go to Tools -> Redirection
- Click Add New
- Set the source (old) and target (new) URL
- Click Add Redirect
For more information on some of the more advanced options available in the Redirect plugin, head over to https://redirection.me/.
Creating a 301 redirect with Yoast SEO Premium plugin
Yoast is one of the most popular WordPress SEO plugins on the market. The free version is excellent in my mind and can add a ton of great SEO help to an otherwise poorly searched blog.
Note that the 301 redirect functionality is only available in the Premium version of Yoast.
- Click into the SEO menu in your admin bar
- Select Redirects
- Select 301 (assuming this is what you want)
- Enter the old and new URLs
- Click Add Redirect
- Test by going to your old URL and making sure it redirect to the new one.
For a more in-depth look at doing other types of redirects within Yoast, check out how to use their Redirect manager.

Note that even though we use Yoast Premium on most of the websites we work on (including this one), we still prefer to use the Redirection plugin for all of our 301s. We find it easy to use and has more options for redirecting URLs with query strings (eg: https://your-url.com?this-is-a-query-string).
Having said that, if you have Yoast Premium installed then definitely give it a whirl first so you’re not needlessly installing more plugins into your site.
How to create a 301 redirect in Shopify
![]()
Shopify has redirection functionality built-in without needing an external plugin.
There are a few caveats to be aware of when creating page redirects in Shopify though.
- Some URLs can’t be redirected, as they’re part of the core Shopify functionality. Those include any URLs that start with /application, /apps, /cart, /carts, /orders, /shop, or /services.
- The page you’re redirecting from must be a broken link (ie: it must not work). I’m not a fan of this, to be honest. Quite often when I’m creating a redirect, it is a planned exercise. As previously mentioned, it may be because I’m combining a bunch of articles into one. Ideally, I’d like to set up the redirect first and test it before deleting the old page. With Shopify, you don’t really have that option. Squarespace has a similar restriction.
Be sure to be logged in to your Shopify admin, and then:
- Click on Online Store -> Navigation
- From there, click URL Redirects
- The Redirect From part of the form needs to be the old URL that you want to direct people away from (eg: /my-old-product)
- The Redirect To part is where you put the new URL that you want the old one to redirect do (eg: /my-new-product)
- Click Add
- Test it by going to thew old URL and make sure it diverts to the new one.
How to create a 301 redirect in Squarespace
![]()
Setting up a page redirect in Squarespace is pretty straightforward, although not quite as simple as Shopify.
As with Shopify, there are some similar caveats when redirecting a page on your Squarespace website:
- You can’t redirect a page from your website to a different website
- A redirect will only work if the page you’re redirecting from has been deleted or disabled
- The URL you redirect to cannot have special characters (? & # etc). This means you cannot redirect to hash links (eg: dmain.com/page#target).
- You can’t redirect to reserved URL slugs, such as account, api, cart, checkout and more.
- There is a limit to how many redirects a Squarespace site can have. This is measured by filesize, which confuses the issue a little.
Once you’re happy that you can deal with those conditions, this is how to actually do the redirect:
From your admin dashboard, head to Settings > Advanced > URL Mappings.
A text field will show. You’ll need to enter the following information, and in this format:
Now, to be clear, you do not put your whole URL in, just the part after your domain. If you’re unsure of how your URLs are architected, check out of our article about URL structure and SEO.
If your update is a 302 instead of 301, then just type 302 instead of 301 in the mapping.
If you’re redirecting a page to your homepage, then the destination is simply a slash:
To add more redirects, simply add the new ones on a new line:
/that-page -> / 301
/last-season -> /this-season 302
Always make sure your redirects are working
One final note is to always check and test your redirects. If they’re not working as expected, double-check your syntax, as well as capitalisation. URLs can be case-sensitive depending on your site architecture, so keep that in mind. yourdomain/this-page and yourdomain/THIS-PAGE can sometimes be totally different pages.
Pay what you like for our "SEO for Australian Small Business" eBook
Thanks for reading How to redirect a web page in WordPress, Shopify and Squarespace.
In recognition of the small businesses who have been doing it tough in recent times, you can now pay what you like for our SEO for Australian Small Business eBook.
Minimum price is $5
Check out SEO for Australian Small Business